
Saturday, December 24, 2011
Tuesday, December 13, 2011
Sock Santa
I love making stuff from socks for two reasons: quick, cheap and easy (mostly).


Ok, that's three reasons ...

LoLo is in love with Santa, but who wouldn't be? A guy in red with a fuzzy white beard, two big eyes that brings gifts? Just like daddy! (Uhmmm ... almost :)
What's great about this project is that even the smallest children can help with it plus the steps can be also used to make sock snowmen.
- This is what you need for the Santa:
A pair of red knee-high socks
One single short white sock preferably the thin kind
Polyfill or any other kind of stuffing material suitable for soft toys
A cup of rice
Two buttons
1 ball of cotton wool (the tip of the hat)
A few rubber bands - large and small
A piece of fuzzy stuff for the beard (you can also use felt and cotton wool)
Glue gun

Step 1.
Take your knee high sock (as shown by Lola on the first photo) and cut through on two places. Straight line just above the heel and straight line below the heel. Now you have two pieces of the sock - one long for the body and one short for the hat.
Step 2.
Take the long part (body) and a rubber band and pull it all together to make a little sack. (photo 3 left to right) ... Turn it inside out (photo 4)
Fill the bottom with rice and stuff the rest with polyfill all the way to the top (as seen London doing it on the photo) and the next picture of our kitchen table and LoLo woking hard ...
While stuffing the sock arrange the polyfill evenly - you may make your Santa as thin or as overweight as you see suited, or as much as the sock lets you. In any case, do not under-stuff the guy! When it comes to Santa and body image it's a very healthy one! ;)
Close the top of the stuffed red sock and put another rubber band over his head twisting it at least twice to make a head.
Step 3.
Cut off the heel and the toes of your single white sock. Now you have a tube.
Make a little ball from the polyfill and take your small rubber band.
Put the ball against the inside of the white sock leaving enough space for the face. Secue the ball in place tight. Pull the white "face" over the red sock head as seen in the last photo.
Step 4. (not pictured)
Take the toe part of your red sock and put a rubber band over the toe part to make it look like a hat. I also glued a cotton ball to the end of it. Pull on Santa's head and sew or glue in place.
Step 5.
Glue eyes and the beard in place .. VOILA!

Here he is with his sock snowmen family.
The inspiration for the sock snowmen came from here:
The tiny once are not filled with rice, because I will be using them as a tree decoration. I try to make special ornaments every year from LoLo's stuff .. For LoLo's first Christmas I made ornaments from their momma-made patchwork blocks, last year I made a bunch of ornaments from their second year birthday cards (using a scallop hole puncher) and this year everything is sock and tights made! :)
From left to right: Daddy snowman from Geoffrey's "holey" socks; Lola snowman from Lola's tights from last year; yellow stripes snowguy is from London's baby socks and the red one was warn by mommy, of course. The baby at the back is also made from Lola's tights.
I brought the project to our group "Bobita" which is a Hungarian children's group here in Manhattan and look what we've all made ..

If you make some of these cuties, please send me an email or a Facebook message pretty please ...
I would love to grow the Santa/Snowmen sock family.
Have a wonderful week everyone!
LO(lo)V(i)E
LV
P.S. I just thought about this one .. How about hiding a gift inside Santa's belly? Yes, he would have to be operated on, but still a cute idea, no? Or a marriage proposal from inside Santa's belly .. Hmmm .. OK, before I come up with more strange stuff .. bye byeee
Thursday, December 8, 2011
Advent calendar 2011
December must be the craziest month for all crafters considering all the presents to be made. I have a long list that will last 5 Christmases. I start and never finish many, but this one I did! I made an advent calendar for LoLo.
It's really a knock off calendar of the one I saw in a magazine for 95 USD, so I don't deserve much creative credit ... but if you really can't hold it back that's also ok with Moi ;o)
Last year I bought LoLo a paper calendar for 99 cents at our local food store and that worked just fine (in terms of developing chocolate addiction, especially when it comes to London), but I also thought it' would be just nice to hang something cute in their teeny-tiny room and make it even more colorful and festive ...
I found a mitten pattern online and made it to fit the page to print. Then I cut out a 48 pairs of colorful mittens. Instead of sewing, I hot glued the pairs together and tied them on a ribbon. Too much work if you ask me, but all worth it! See for yourself ...

This is how they all looked on our kitchen island ...

I cut corners on this project where I could - can you tell? :) I really didn't feel like tracing the numbers so I didn't - they are all just hand drawn out as it came. I used fabric scraps from my Romero Britto project, which had double sided adhesive on already. All I did was cut, glue and iron ...
Pretty easy, huh?
London's side of the room ...

Lola's ...

"Surprise!"

Yupp .. almond kisses and Chanukah gelt for eight days because we celebrate all the holidays where we can eat, drink, be merry and get presents and chocolates ;) ...
Happy Christmas/Hanukkah shopping everyone! LV
Tuesday, November 29, 2011
Knitted leg ruffles
If you've been following my blog you know that I love all sorts of leg warmers and have made a few for Lola to wear last winter. I can not wait for the weather to get colder so she can wear them again. Finally, I decided to knit a pair for myself, but more "foot warmers" to cover the foot rather than the leg. I got the pattern from a magazine. It's an easy and quick knit, I promise! Plus these things are so useful if you have a pair of shoes you love, but find them too cold to wear. Just make a few of these and you'll never have to wear boots in your life again ... (well, maybe :)
P.S. I am updating this page two years later. I originally said to email me for the pattern, but I was able to track down the designer - her name is Jane Burns and her blog is http://knittingimage.wordpress.com/, please contact her for the pattern. She has many beautiful designs.


P.S. I am updating this page two years later. I originally said to email me for the pattern, but I was able to track down the designer - her name is Jane Burns and her blog is http://knittingimage.wordpress.com/, please contact her for the pattern. She has many beautiful designs.

And another shot ...

Leg ruffles all dolled up in action ...

LO(lo)V(i)E to you all, LV
Thursday, November 10, 2011
Painting to Fabric .. another Romero Britto
When one of my best friends, Blanka asked if I could somehow contribute to the gala evening benefiting Alzheimer's disease she is helping to organize, I immediately said "yes" ... I am always the first to volunteer and last to realize how much work it will involve ... Oh oooohhhh
I promised to make a fabric "painting" similar to the one I made for my mom's apartment (see HERE) for the silent auction. I decided to make another Romero Britto painting called "Twist" (as in dance). The event will be attended by the dancing community, so I am hoping somebody will fall in love with this "fabting" as much as I did ...


I promised to make a fabric "painting" similar to the one I made for my mom's apartment (see HERE) for the silent auction. I decided to make another Romero Britto painting called "Twist" (as in dance). The event will be attended by the dancing community, so I am hoping somebody will fall in love with this "fabting" as much as I did ...

It's not the original, but darn close to it and more unique ...
Plus, my guy is wearing trendier pants made from knitted print ;)
Plus, my guy is wearing trendier pants made from knitted print ;)

(Ok, this was my sales pitch for the silent auction for the ball this Friday) ...
The process is exactly same as already described HERE ...
It's not hard at all and doesn't require much skill, just a whole lot of patience and sitting behind the sewing machine and the ironing board.
Below are a few progression photos.

Shall we dance?

Let's have fingers crossed the "fabting" will sell ...
"Fabting" - a word made up by LV for the lack of other words; A painting made from fabric;
Also a fabulous thing ... Can you think of anything else?
Have a fabulous weekend everyone! Many more projects cooking. Stay tuned!
LO(lo)V(i)E, LV
Saturday, October 29, 2011
Toddler jeans makeover
One of the few hand-me-downs we've received for LoLo was a pair of jeans. I didn't mind the color, but the "style" was just really terrible. I've seen many jean makeovers from wide leg to skinny and so I followed in the footsteps of moms that try to bring some fashion into their little guy's wardrobe.
Check Freshly Picked blog for the skinny jean tutorial HERE

(Story time: Right after LoLo was born I went clothes shopping to our local Duffy's. While I was finding the cutest outfits for Lola, I couldn't even locate the boy's section, let alone a single outfit! So, I asked a shop assistant if it was on a different floor for some reason. She smirked and pointed at a single rack of clothes with about 50 items hanging on it. "Over there")
So, back to my tutorial (sort of tutorial). After I followed instructions on slimming down the jeans, I dug out an unused foot file and filed the heck out of the jeans, making holes and wears all over the place ... (Hubby was like: "LV, why are you using the foot file on our kitchen table? And what are you trying to do with those jeans? You are not going to put it back to the bathroom, are you?)

I then found fabric, cut out patches big enough to cover any "ventilation" holes I just made on the jeans, so my little guy doesn't get cold; pinned the fabric to the jeans from inside out and was ready to sew ... Then I wasn't ready to sew ... I realized, that you can't really sew through such a small opening with the sewing machine .. ARgghhhhh ... you know the saying "measure twice, cut once"? That never applied to me! So, take my advice: saw the patches on by a sewing machine BEFORE sewing up the skinny legs! Unless ...

It's funny though how things just work out at the end (most of the times that is) ... I took an embroidery thread and needle and sewed the patches on by hand, which gave it so much character!
Don't you think? And how about that modeling pose of my favorite man in the world?

And here are a few pictures from our fun day out wearing the momma-made-cool-jeans :)

Hope you are all doing well. LO(lo)V(i)E to you all, as always, LV
Tuesday, October 25, 2011
HalLoLoween 2011
As promised, here are shots of our first HAlLOLOween party ... I am hoping to make it a tradition, as LoLo loves all the excitement around parties and the guests seemed to have a jolly good time also ... (Once again, I struggled with the photos, so some may be better than others. I have already spoken to Santa and he promised an early Christmas gift in a form of some camera equipment, so there is hope for future photographic improvement ... YAY! )

Once again, I used Bird's printables ... The wreath above is stolen from the front door, the cupcake stand is made of three cheap trays from Party City and 2 printable-wrapped cans of chickpeas :)
I didn't have time to carve the pumpkin, so I stuck felt eyes, nose and a mouth on the poor thing. The scarecrows were bought for 1 USD each at Michaels ... The Buddha is displayed by default and if you can see it, there is a witch hanging off from the right corner. I got it as a gift from my Czech friend, Oli, who said that according to Czech belief, every household should have one with a broom, hanging somewhere in the house. Supposedly, she sweeps out all the problems of the house ...
(The Mr. would surely argue that there isn't a need for such a thing in our house as he's got a live-in one instead ... just a bit of trivia for you ... )

The party was pot luck so there isn't as much food displayed ... plus I forgot to serve all the 40 cupcakes that are still in our fridge :(((( ....
Yes, I made a cupcake stand and then forgot to serve the cupcakes! I should get an award for this!
Here are the details ... blueberry muffins, "monster treats" - Halloween pretzels, the ghosts are goody bags for the munchkins containing a notebook, an edible Halloween necklace, a wafer, pretzels, a ghost stamp and tattoos).
I lined a plastic pumpkin with foil and used it for chips (the guacamole is not pictured here), then of course there is the Mr. making roll ups that looked better than tasted ...
(not due to his fault, I should add here :)

According to LoLo, there is no party without party hats ... so those orange frills are part of the hats (tutorial HERE, the bucket is wrapped in paper and decorated once again with Bird's printable pumpkin, the little orange basket contains tattoos, black and orange balloons and the old fashioned gumball machine is filled with candy corn, of course. Once I put it together, I realized that you actually need a coin to get the candy out .. How about that for hospitality? "Here is some candy, you just have to pay for it" :))) But, I decided to display it anyhow, as I love the look of it, plus it's great portion and sugar control for the kids ....

LoLo's t-shirts were also made by momma. You can make them also in about 10 minutes! Felt eyes, nose and mouth sewn to the shirt and voila! Lola's shirt has a feather collar for extra glam. I used feather string bought at Wallmart, cut the rim of the collar and sew the string to it ... That's all!
Now, what's for entertainment?

Everybody loves crafts - even if its all secretly made by parents :)

Part 2 and 3 of the entertainment ...

A special guest ... Serafina, the sock monkey tutorial coming up soon!
Hopefully by then I will have made her ballet shoes also. 

There is no party without candles and a big blow .... pffffffffffffffffff pffffff pfffffffffff
LoLove, LV
Monday, October 17, 2011
Not another Halloween wreath?!
I know you've seen them all, but bear with me ok? This one is so easy you can make it with your eyes closed! ... hmmmm .. ok then One eye closed ... :)
Our apartment building is never decorated and I keep walking past these buildings with mums and skeletons, pumpkins and spider webs and then there is our entryway - empty and sad!
Well, this year I decided to change this ...
I thought about making a wreath from little orange and black pom-poms, but that never happened because the craft store was out of foam wreath and the only one I could buy was the one from tree branches, which I like but none of my other wreath ideas worked with it.
THEN I thought of my friend Bird's amazing printables! (This girl is so talented I am green with envy every single time she posts something new on her blog.) The only thing I wish she was making is printable clothing .. just imagine how much easier my morning routine would be, how much space we'd save in our NYC closets and how my hubby would be freed from any shopping for clothes duties - we'd cut them out in front of the TV watching the JETS ... LOL
Well, this is what I came up with at the end using Bird's Halloween collection ....

No, it's not a bicycle decoration, but the glass on the door made it impossible to take a good photo and I didn't want to sneak around the neighborhood hanging my wreath on other people's doors ...

I will be using the printables also for our "Boo at LoLo's" party this weekend so stay tuned ...
There is still time to get your scissors (I mean hands) on these printables HERE.
LO(lo)V(i)E to all ... LV
Tuesday, October 11, 2011
Bringing home the pumpkin patch
Seven seasonals you may not know about me (us):
1. I own a pair of orange pants (the same exact color as those pumpkins below ...
uhmm not a surprise? :)
2. London's favorite Hungarian word is "orange", which is also probably one of the most difficult Hungarian words to pronounce "narancssarga"
3. When I was a little girl my grandma used to bake pumpkins for me and I never liked them.
Ever since I moved to the US I bake pumpkins every year, so that I can relive many of my childhood memories that remind me of her.
4. I love pumpkin spice latte despite of the fact, that the flavor has probably more to do with some artificial flavoring than the pumpkin itself ...
5. I would love to get lost "for real" in a corn maze (preferably not alone and not in the dark :)
6. Though it seemed romantic at the time of our wedding photos, rolling in hay is really, really really not a good idea
7. I would love to bake a pumpkin pie .. Anybody with an easy recipe?

Last weekend we took LoLo to a pumpkin patch and apple picking in NJ ...

After a wonderful day spent with nana and papa, I decided to bring the pumpkin patch home.
LoLo had these two pullies full of building blocks that they never used. The building blocks ended up in some toy bin and the wooden trays (one from Ikea for 7.99 USD - I have their older version and another one from Target) just kept taking up space ... I've been experimenting with Mod Podge (decoupage glue and sealer) lately and so I decided to mod podge the pulley ...

The process is easy ... clean the surface of your object, put a layer of mod podge on the object, spray water onto your paper so it's just damp, put the paper carefully on the tray and smooth. Let it dry and repeat the top layer of MP as many times as desired. (I did two layers). See the last photo? I bought the rolling tool at Michael's and it's an absolute must if you are going to mod podge anything or everything just what I am doing these days ...

Our toddler group is having a Halloween party,
and I think I will make cupcakes and serve it on this tray ...

Check out the tutorial for the acorns HERE if you'd like to spend a night sewing these little buggers :)

Did you get scared? :))))
Boo, LV
Saturday, September 24, 2011
How about a coffee with that diaper cake?
My friend Kerma is having a baby! YAY!
It's going to be a Thanksgiving baby and I am so thrilled for her and the entire family. Ever since she told me the great news I kept thinking what gift I would make for the baby and finally decided to make something I've only seen in the US - a diaper cake. The idea of a diaper cake doesn't really excite me to be honest, but anything that looks like something and hides something else (like a good bottle of wine) does :)
Sooooo .. I bought a bottle of Chilean vine (Kerma is Chilean), a box of size 1 diapers (they grow out way too fast from size 0) and a few items all penguin related as Kerma loves penguins and so will the baby (I guess :)

The penguin items (from top to bottom) are: a penguin onsie rolled up, a book about a penguin, a wash mitten with a little orange hook for the bathroom and a stuffed overweight penguin :)
What else do you need?
- A box of size 1 diapers (I used 56 Pampers)
- A bunch of rubber bands
- A tray (I bought this one from Party City - you can find trays of any color here)
- Clear tape (Double sided works better, but I didn't have it, so I improvised)
- Tissue paper (2 sheets per layer)
- Paper for decorating (I used wrapping paper also bought at Party City)
- Ribbon (The wire kind makes prettier bows, but you can use any kind)

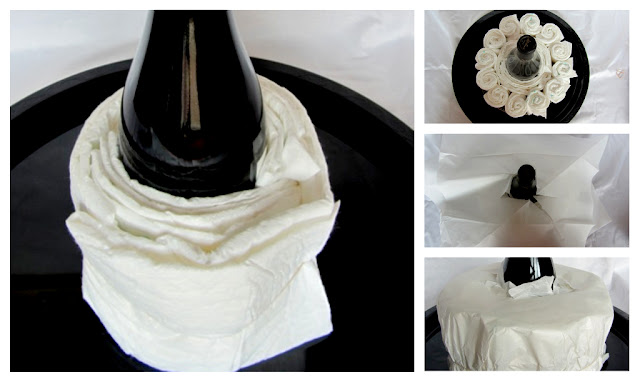
- Make a bunch of little diaper rolls. Put 2 together (upside down), roll and tighten with a rubber band
- Wrap your bottle around with loose diapers
- Place your rolls around the bottle
- Take two sheets of tissue paper, cut a hole just big enough for the bottle's neck to go through in the middle and pull on your first layer of tissue paper
- Smooth the paper down, put rubber band over the entire layer and tuck below. Don't be discouraged if your cake at this stage looks like a pile of poop (pun intended) .. it will get better, I promise .. just keep those diapers rolling and placing them on top of each other

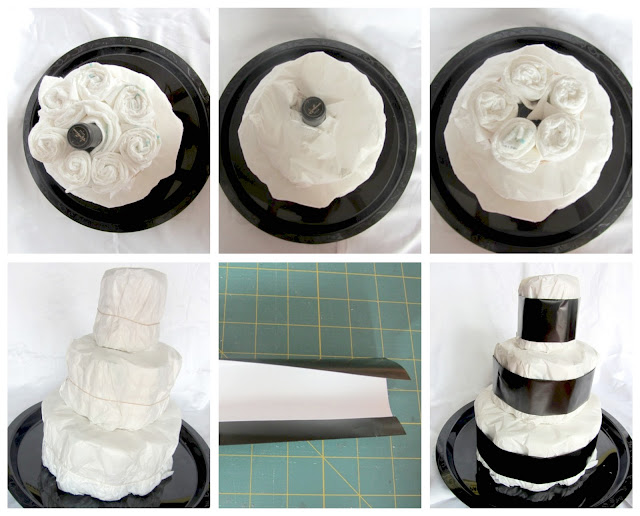
6. Follow the same process on layer 2
7. Second layer tuck-tuck is a bit trickier, but once the rubber band is in place it will start to shape up
8. Proceed the same way onto layer 3, but depending on the shape of your bottle and how many diapers you rolled around the center you may want to make your rolls just singles, as I did ...
9. Ouuu Ammm Geeee ... see what an ugly cake??? (I almost gave up at this stage and thought it will look ridiculous and I will have to really bake a cake instead ... )
10. Cut your wrapping paper - I cut 6 inch wide strips and folded them on the top inside ...
11. See? Looks a bit better with the black around the layers, doesn't it? You can use glue dots to attach the black layer or a double sided tape or just fold a single sided tape and pretend it's double and attach that way ...
12. Tie your ribbon around, make the cutest possible bows and attach any gift items you want to with a tape. (The sticky will wash out don't worry ... )

All done!
And here is Kermita holding her cake ....

If you are in NYC and would like a cake - this one or a similar one, or have a theme, but not a soul to make the cake for you and you really, really don't feel like rolling paper diapers in your free time
(I understand :) drop me an email: lolovienyc@gmail.com .....
Lots of warm, fuzzy, cuddly penguin hugs and LO(lo)V(i)E
LV
Wednesday, September 14, 2011
Cheater's quilt
Hi Everyone!
I am back to crafting after a trip to Europe that left us all sick and jet-lagged for longer time than desired (not desired). We had a short week to recuperate and get all the gear ready for LoLo to start kindergarten this week. In all the excitement, I completely forgot that LoLo needs blankies for their midday nap at school.
I always thought I'd make them blankets from the onesies (I saved all of them and I am just waiting for the opportunity to make them into a quilt), but I had no time, so I decided to cheat instead ... :)
I bought two fleece (pink and blue) blankets for 3.99 USD at Ikea (link HERE) and a yard of pink and blue fabric. London loves cars and tractors and pretty much anything with four wheels ....
I loved the farmer's village theme on this one ...
I loved the farmer's village theme on this one ...

Lola doesn't care as long as it's pink. VERY pink. So, I bought her fabric with nursery rhymes pattern.

My first instinct (as always :) was to put a pom-pom trip around the blanket, but I decided to make letter sandwiches (two layers of quilting material) instead and attach them to the corners. This way I can avoid the labeling process. Lola's four letter name worked wonderfully for the corners, but London's needed to be modified by attaching two letters twice.


Happy customers .... They wanted a "tuck tuck" with their new blankets while it was 85 F outside.
I guess this project is a success :)
See you later, aligator! I'll be back with a baby shower gift tutorial and a decorating idea.
LO(lo)V(i)E to you all as always, LV
Saturday, August 27, 2011
Paint a picture with fabric or Romero Britto in cotton
A long time ago I found a picture of a painting in some magazine and loved it so much I tore it out and carried it in my wallet. It was a colorful painting of a boy reading a book ...

I knew I could not copy it on canvas, as my painting skills remain at a level of a house, a flower and a snowman, but thought I could reproduce it in fabric somehow. Years later I watched the show of Bethenny Frankel, when I saw the painting she gifted to her husband to be and new immediately it was by the same artist. As I found out, the painter is Romero Britto and all his paintings are virtually painted for those like me - color lovers with zero ability to paint but love of fabrics.
I decided to make one of his works for my mom's birthday and chose this one ...

I uploaded the photo saved of the internet to BLOCKPOSTERS.COM and made sure it will print in a size I want. Once printed, I cut off the sides of the pages to make the poster and sealed it together with a clear tape ...

Afterwards, I cut up the poster to trillion little pieces. Be careful here, because you have to add the black line to either one of the bordering pieces and once in a puzzle form, it gets a bit hectic! Being this my first puzzle painting I cut up the entire poster at once, but I suggest you go step by step - bottom to top to avoid spending hours googly eyed figuring out where each piece belongs as I did ...
I sorted the pieces by color and by pattern and rummaged through my fabric stash to pick and choose the fabrics. I had to buy many quarters, as I wasn't able to find the pattern I liked or the one that would match. As you see, the vase rests on two different patterns as a base. You will need the most of these two fabric. I chose a blue and black polka dot and a grayish blue flowery kind for the base.
I measured the size of the poster and cut these fabrics to coordinate the size of painting I wanted.
And now the most tedious part ... piece by piece I ironed a two sided heat-and-bond to the fabric, I used my puzzle piece to trace the shape and cut it out.

Look at this chaos ...

Trying to figure it all out without a headache ....

The fun part ... putting it all together one ironed press at a time ...

YAY .. almost ready ...

Lastly, just zigzag through the entire thing line by line by line as in any applique, sew sides to it so it can be stretched to a wooden frame ....
HAPPY belated BIRTHDAY MOMMY!


I am so thrilled the way it turned out, I can't wait to start our bedroom picture ...
Which one shall I do???
Kisses?????

Or "Tonight"????

Lo(Lo)V(i)E to you all from Slovakia,
LV
P.S. Will post the painting hanging on mom's wall, but still waiting for a gentle-man to hang it for us ...
Subscribe to:
Posts (Atom)